One of our favorite summit hikes along the front range of Colorado is Devils Head lookout tower (W0C/FR-051). This hike is about 1.5 miles one way with 900 feet of vertical gain. See my summer trip report from July 2012 for more information on the hike. This year we activated the summit in winter.
The sign at the bottom of the steps leading to the fire lookout.
One problem with this trail is that it has become extremely popular in the summer months. The actual summit and lookout tower is not very big and can get very crowded. This is tolerable for hiking but can make a Summits On The Air (SOTA) activation difficult. It certainly is not a “get away from it all” experience.
Joyce/K0JJW and Bob/K0NR on the trail to Devils Head.
Recently, Brad/WA6MM pointed out that the summit is still accessible now (in late November) and the crowds have all disappeared. Note that the trailhead will be difficult to access starting December 1st (see the Devils Head forest service page).
Typical trail conditions for our hike.
We took highway 67 out of Sedalia, then south on Rampart Range Road (FS 300) to the well-marked side road that goes to the trailhead . The forest service roads had 6 to 8 inches of snow on them but we were able to drive our 4WD pickup truck to the trailhead without any problem. The trail was also snow covered but walking in high-top hiking boots worked just fine. We had our microspikes along in case of ice but did not use them.
View of the Devils Head lookout tower in winter.
As you can see from the photos, it was a bright sunny day…wonderful day to be out hiking in the mountains. Temperature was about 25 degrees F but very light wind.
View to the east from the summit of Devils Head.
We met a total of four other parties on the trail, so not very busy.
Once on top, we started calling on 146.52 MHz with many stations responding. That summit has good line-of-sight to Denver and the other front range cities. As things quieted down on 2 meters, I switched to 446.0 MHz and worked a bunch of stations there, too. We were using the small TYT 2m/70cm mobile transceiver (which I recently repaired) and yagi antennas for 2m and 70cm. I also had my 23cm HT and Comet yagi with me and managed to work Paul/W0RW on 1294.5 MHz, about 33 miles (53 km) away in Colorado Springs.
Here is my log from the activation:
Joyce worked a subset of these stations. In particular, she was very happy to work three women. She has been referring to these contacts as “F2F” for “female to female.” On this activation, her F2F QSOs were: Annette/KA0JKZ, Sharon/KC0PBR and Barbara/W0BJE. Way to go, ladies!
Bob/K0NR holding the 1.2 GHz Comet yagi antenna.
We’ve made a note to do this summit again next year, after the crowds are gone. It is a really nice early winter hike. Thanks to everyone that worked us on the summit.
The summit of Selun (HB/SG-049), left of center, viewed from the trail.
Joyce/K0JJW and I were planning a trip that included some time in Europe. It turned out that our airline route would connect through Zurich. Rather than spend a few hours in an airport, we decided to spend a day or two in Switzerland.
Somehow the discussion turned to Summits On The Air (SOTA) and whether we should do an activation in Switzerland. Slowly, a plan developed to do a “check the box” activation on a local summit near Zurich. As readers of this blog know, I’ve been exclusively using VHF/UHF for SOTA activations. We decided to pack really light so SOTA gear on this trip was extremely limited: 2m/70cm handhelds and vertical antennas. Sorry, no yagi.
The super-compact, multi-op VHF SOTA kit: two FT-1DR transceivers, two RH770 antennas and a charger.
SOTA Help
I came across this thread about the proper callsign prefix when operating under CEPT rules in Switzerland. The SOTA association is called HB but valid callsign prefixes are HB9 (full license) or HB3 (novice license). This sent me back to the CEPT rules to make sure I understood them correctly: Recommendation T/R 61-01 and ECC Recommendation (05) 06. The short story is that as an Amateur Extra licensee, I operate as HB9/K0NR. Joyce has a General Class license which corresponds to the “novice” category under CEPT, so she uses the callsign HB3/K0JJW. Apparently as an Extra, I had previously overlooked or forgotten some of the fine points of CEPT. Specifically, US Extras are given full privileges by CEPT but Generals can only operate in a subset of CEPT countries while Technicians get no privileges at all (yet another reason to upgrade your license).
Joyce/K0JJW and I have one day in Zurich later this month. Somehow the idea of squeezing in a SOTA activation while in Switzerland made it onto the itinerary.
This will be on 2m FM only with basic gear. The current plan is looking like a hike up Altberg (HB/ZH-015) but we are open to other ideas.
A number of people responded with helpful information. Soon I was contacted by Paul/HB9DST who suggested we do an activation together. Paul is an American living just outside of Zurich (his US callsign is AA1MI) and is very active in SOTA. We soon had our eyes on the Churfirsten SOTA summits which are southeast of Zurich (see Paul’s activation reports). Ultimately, we chose the summit of Selun (HB/SG-049). Clearly, this was a huge upgrade to a classic Swiss mountain (compared to our original plan).
Activating Selun (HB/SG-049)
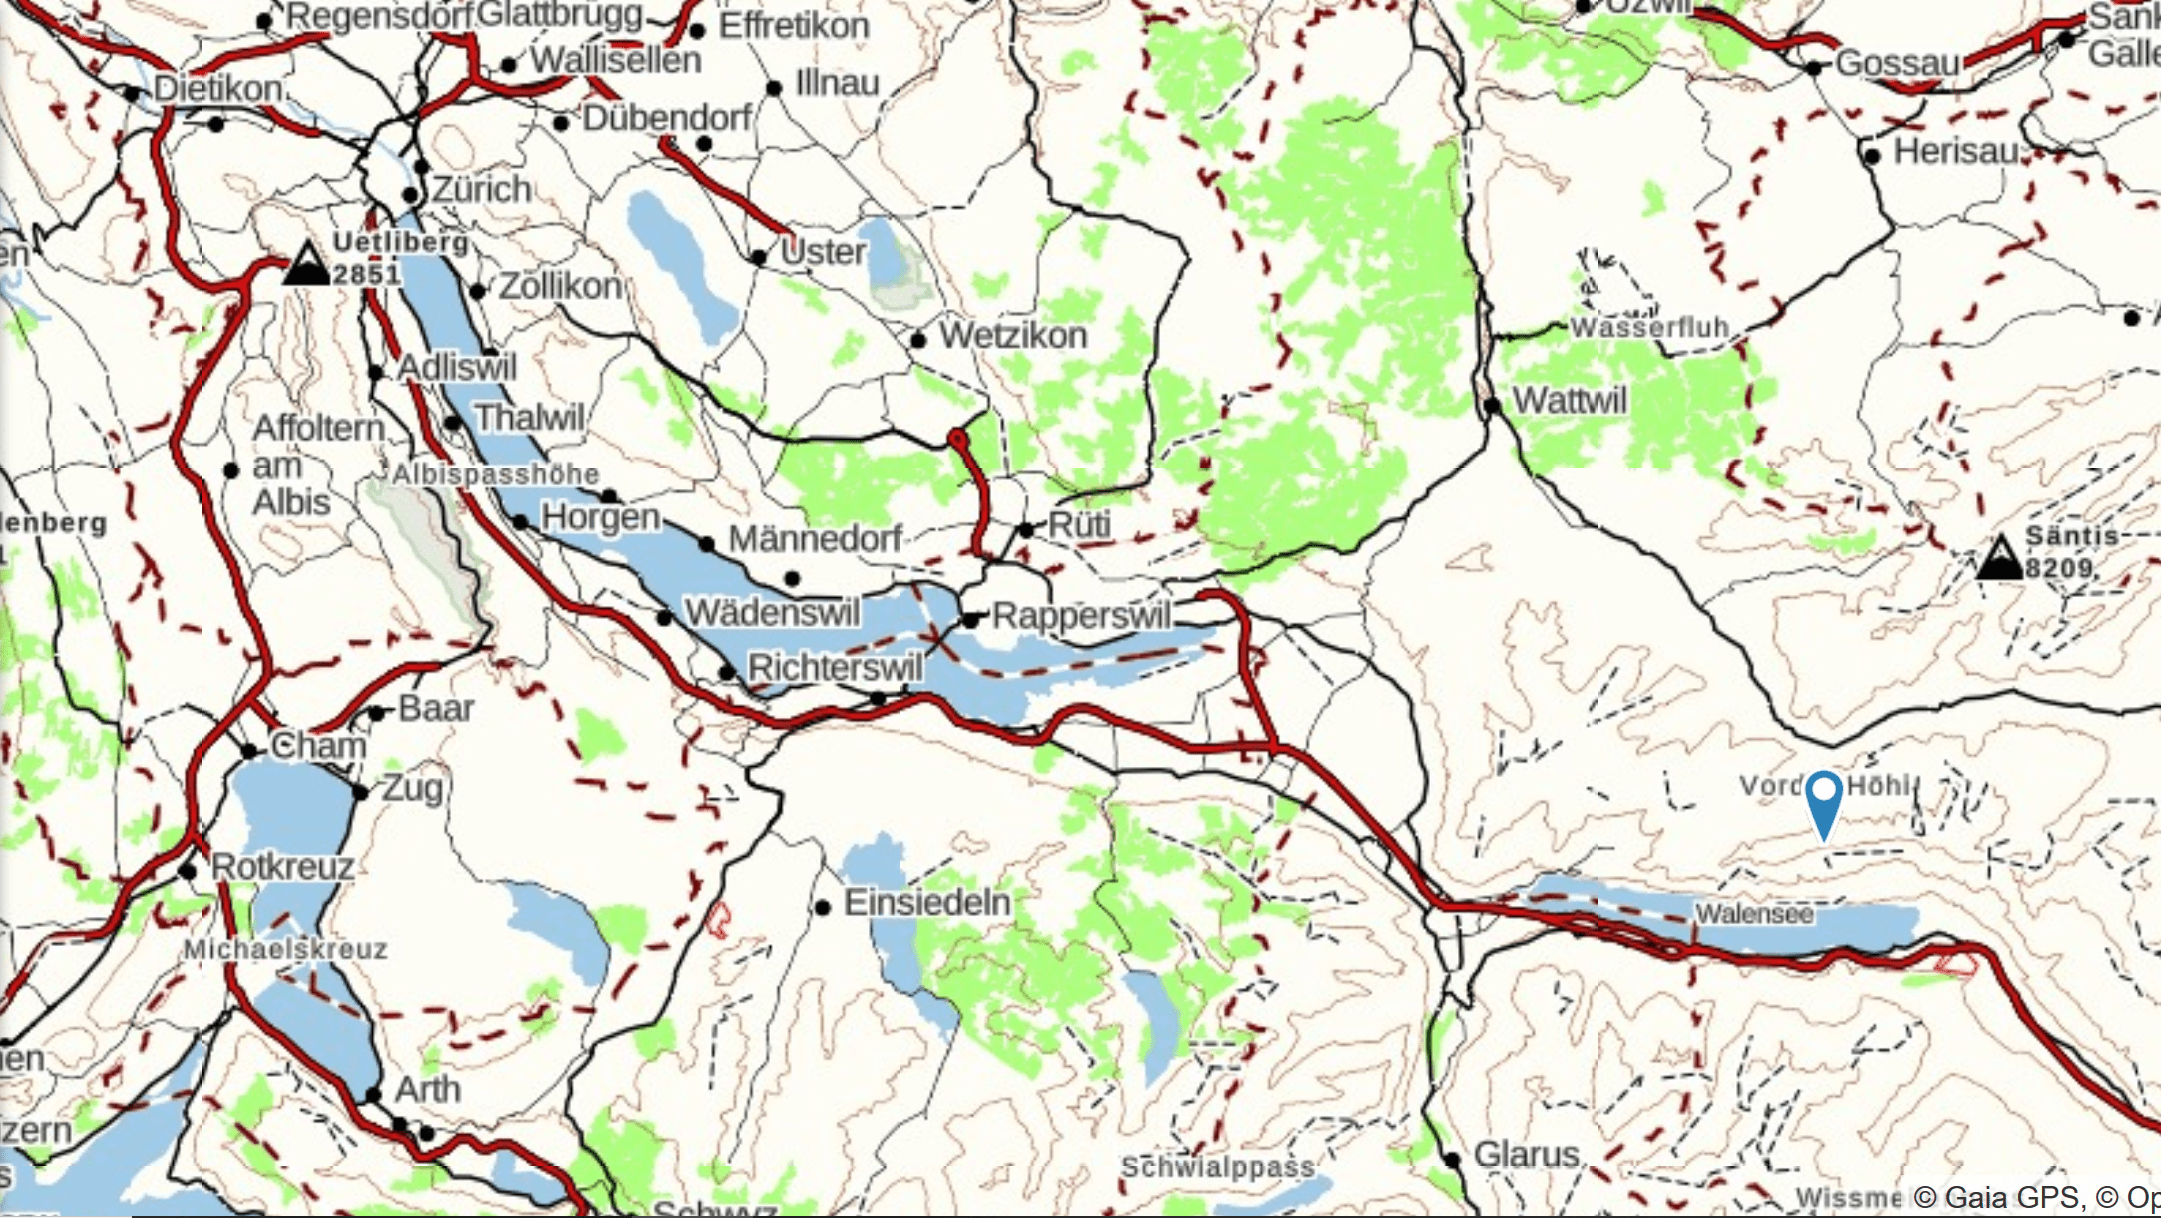
Selun (HB/SG-049) is east and a bit south of Zurich by 35 miles (56 km), as indicated in the lower right corner of the map.
Access to the trail was via several train rides and a bus ride (about 2 hours), then a short walk to the Selun cable car. This cable car is quite unique in that it is a homebrew design (see the photo below). We piled into the cable car and rode it to where the real hike started.
The Selun cable car is a bit of a homebrew device but perfectly safe. As far as we know.
Joyce/K0JJW and Bob/K0NR riding the cable car.
On the Trail
The bottom station of the cable car is at ~3000 feet (900 m) which took us up the hill to ~5000 feet ( 1500 m), so it definitely sliced off some elevation gain. The summit of Selun is at 7234 feet (2205 m), which gave us a moderate but not crazy difficult hike. My GPS app recorded a distance of 1.7 miles and 1900 vertical feet (one way).
Our hiking route is shown in blue ascending the summit from the north. There are six other SOTA summits on the same ridge, marked by waypoints on the map.
We were treated to wonderful views on the hike, often with clouds laying low in the valley.
The weather was excellent for late October with blue skies above and some clouds laying in the valleys.
Joyce/K0JJW working 2m fm with Paul/HB9DST cranking out the CW contacts in the background.
Paul is an HF/CW enthusiast so that made sharing the bands very easy. He strapped his fishing pole to the summit cross and strung out an end-fed wire for 40m, 30m and 20m, making a total of 40 QSOs. Joyce and I took turns on 145.550 MHz FM using our Yaesu FT-1DR handheld radios with vertical antennas.
Paul/HB9DST working HF CW on the summit.Bob (HB9/K0NR) operating 2m fm from the summit of HB/SG-049.
I made 13 contacts on VHF, including three Summit-to-Summit (S2S) contacts. HB9PMF was close by on SG-017 (Hinterrugg), another summit in the Churfirsten. I also stayed on the summit while Joyce and Paul hiked down out of the activation zone so they could work me for chaser points, giving me a total of 15 QSOs.
My log is shown below. All contacts were on 145.550 MHz. Note that the calling frequency in Switzerland (all of Europe?) is 145.500 MHz. Joyce worked a subset of these stations.
The HB9/K0NR/P log from HB/SG-049
Operating notes
I have to admit that it was a challenge keeping everything straight while making QSOs. I had to add the HB9 prefix on the front of my US callsign and “portable” on the tail end (local practice for activator stations). That’s “HB9/K0NR/P” instead of just “K0NR”…there is a reason we prefer shorter callsigns. All that along with the usual signal report, name, SOTA designators, etc. Fortunately, everyone we worked had reasonable English skills. Mein Deutsch ist nicht so gut. If I sounded a bit confused, I probably was and at only 7200 feet I can’t blame the altitude.
It was definitely a thrill to work the S2S stations and two other countries (Germany and Austria) on VHF. (I have never done that on SOTA VHF from Colorado…I rarely work anyone outside of the state.)
Bob/K0NR and Paul/HB9DST enjoying refreshments after the hike.
After we hiked back down, Paul suggested that we had to stop in at the local farmhouse restaurant (Selun Ochsenhuette) for a drink. It was all part of the Swiss SOTA experience!
Paul was a magnificent host for our short stay in Switzerland. We stayed two nights at his place and he guided us on a fantastic SOTA activation. Without his help, we would have probably activated a small summit near Zurich and would have been in the low clouds all day. We would have left the city thinking “I bet this is a beautiful place when the sun is shining.” Instead, we had an excellent day hiking the Swiss mountains and playing ham radio. Thanks, Paul!
Joyce is showing off her sewing project — a SOTA Mountain Goat patch on Paul’s backpack.
Joyce did find one small way to repay Paul’s kindness. Being an skilled seamstress, she sewed Paul’s prized SOTA Mountain Goat patch onto his pack. Nice job, Joyce!
One question we often hear from new hams (and maybe some not-so-new hams) is “why can’t I get into the repeater?” They get their hands on a new radio, set it up to use one of the local repeaters and it’s not working. Now what?
There can be a whole bunch of reasons why you can’t get into a repeater so it is difficult to come up with a quick fix for all situations. However, in this article we’ll talk about some basic troubleshooting steps to help diagnose the problem. For this article, I am assuming that your first rig is a handheld vhf/uhf transceiver but the general approach will work with mobile or base transceivers, too.
FOT
Many times the problem is due to not having the transceiver programmed correctly. The key things we have to pay attention to are: Frequency, Offset and Tone (FOT). To access a repeater you need to have its Frequency entered into your radio, have its transmit Offset set correctly and have the right CTCSS Tone turned on. You might not need to check all of these things in that exact order but it is a good way to approach the problem. Using the programming software (and suitable cable) for your radio can be a big help.
Frequency –First you need to program in the frequency of the repeater you want to access. The actual key strokes or knob turns will depend on the particular model of radio so consult your operating manual. The frequency you enter is the repeater transmit frequency which will be your receive frequency. Repeaters are always referred to by their transmit frequency, which can be found in an online or printed repeater directory.
Offset – Next, we need to make sure the proper transmit offset is programmed into the radio. This is the difference in frequency between the repeater transmit frequency and its receive frequency. Your transceiver will automatically shift your frequency when you transmit, if you have the right offset programmed. In most parts of the US, the standard offset is 600 kHz on the 2m band and 5 MHz on the 70cm band, and can be either in the positive (+) or negative (-) direction. Your repeater directory will list the offset and direction. Most radios will default to the standard offset but you may have to select + or – offset. Usually a + or – symbol will appear in the display to indicate the offset selected.
As an example, my repeater is on 447.725 MHz with a – 5 MHz offset. So you would enter 447.725 MHz into your radio, make sure the offset is set to 5 MHz and select – as the offset direction. You can verify that your radio is programmed correctly if you see 447.725 MHz displayed during receive, which should change to 442.725 MHz when you push the transmit button.
Tone – For most repeaters, you will need to transmit a CTCSS tone to access the repeater. (CTCSS is Continuous Tone Coded Squelch System.) Repeaters with carrier access do not require a tone, so you can skip this step. This is normally a two-step process: set the tone frequency and then enable the tone. Sometimes this is done with one selection (with “Off” being an option for the tone frequency). Some radios have separate settings for the transmit tone and receive tone. For now, just leave the receive tone off, since it can be a source of confusion. The tone that you need to set is your transmit tone. Most radios display a “T” somewhere on the display when the tone is enabled. Again, check your operating manual.
Kerchunk
At this point, you should be ready to try accessing the repeater. After listening on frequency for a minute, transmit and identify using your callsign. On most repeaters, you will hear a short transmission coming back from the repeater along with a courtesy beep. A courtesy beep is just a short audio tone or tone sequence that occurs after someone finishes transmitting. If you hear the beep, then you accessed the repeater. Congratulations! Go ahead and make a call and see if someone will come back to you.
Troubleshooting
What if you don’t hear the repeater coming back to you? Then we need to go into troubleshooting mode. If the radio is new, you might wonder if it is even working properly. The quality level of today’s equipment is quite good, so most likely your radio is just fine. Still, you may want to check it out.
First, you can check to make sure your radio is receiving properly. In the US, a good way to do this is to tune into your local NOAA weather transmitter.These transmitters are on the air continuously, operating on 162.400, 162.425, 162.450, 162.475, 162.500, 162.525 or 162.550 MHz. These frequencies are outside of the 2m ham band but most ham transceivers are able to listen to these frequencies. You’ll want to set this frequency as simply as possible…use the keypad or VFO mode to enter it directly. In most cases, you can just try the short list of frequencies until you hear the transmitter in your area.
Next, you might want to know that your radio is able to transmit a signal. The best way to do this is find a local ham nearby that can run a simplex check with you. By nearby, I mean within 5 miles or so, because we want someone so close that there is no question about whether they should be able to contact us. Program your radio to a 2m simplex frequency such as 146.52 MHz (the National 2m FM Simplex Frequency). For this test, we do NOT want the transmit offset turned on…the radio needs to be set to simplex. You can double check this by looking at the display when transmitting—it should show 146.52 MHz (transmit frequency is the same as the receive frequency). For this test, we don’t care about the transmit tone…it can be on or off. Have the other ham give you a call and see if you can contact him. If you happen to have a second transceiver, you can try this test yourself – just see if each radio can hear the other one. One warning: do this on a simplex frequency. Trying to go through a repeater can really confuse things because you may not have the offset and tone set properly. Even more confusing is that one radio can “desense” the other radio, which means that the other radio’s receiver will be overloaded and not able to receive the repeater’s signal. Using simplex keeps things simple.
The final thing to check is whether your signal is able to reach the repeater. Well, that is a bit of a challenge! For starters, are you sure you are within range of the repeater? Have you ever heard a signal from this repeater, and was it full scale on your S meter? You may want to ask local hams about whether you should be able to hit the repeater from your location with the radio you are using. For that matter, you might want to check if the repeater is actually on the air – they do go down from time to time.
This brings us to an important point about the use of handheld transceivers. They are really, really handy. How else can you carry a complete ham radio station in your hand? Well, the tradeoff is that an HT operates with relatively low power (5 watts or less) and has a compromised antenna. (The standard rubber duck antenna on an HT is a very convenient crummy antenna.) You may need to add some extra umph to your signal by improving the antenna. Some good dualband choices are a longer whip such as the RH 770 antenna or a magnetic-mount mobile antenna placed on a vehicle or on other metal object.
Summary
In this article, I’ve tried to provide some assistance in figuring out why you aren’t hitting the repeater. The most common problem for newly acquired radios is getting them programmed (remember FOT: Frequency Offset and Tone). Once you have that right, it is usually just making sure that you have enough signal to make it to the repeater.
There is a SOTA (Summits On The Air) summit just north of Tincup Pass with an elevation of 13,538 feet. The SOTA database (W0C/SP-127) says the name is Mount Emma but all of my maps indicate that it is Emma Burr Mountain. (I contacted the W0C Association Manager and we’re working it out.)
Joyce/K0JJW and I did the first activation of this summit in late September. The weather was wonderful except for the wind that pounded us anytime we were exposed on a ridgeline, which is to say it happened a lot. We started our ascent from Tincup Pass, which is at 12,154 feet on the Continental Divide (see photo). I’ve seen trip reports of people hiking this summit from the northeast (Mineral Creek area) accessible by South Cottonwood Road (FS 344), so that may be another option.
We started our ascent at Tincup Pass, which is accessible via a moderate 4WD road.
At Tincup Pass, there is an obvious trail leading off the the east. We followed this trail uphill for a while and then diverted off to the north towards the north/south ridgeline and Tincup Peak. Tincup Peak is not a SOTA summit and is not shown on all maps. It is a13,345 foot bump on the ridge heading north. Our entire hike followed the Continental Divide, always a real treat.
The blue line is our climbing route, up over Tincup Peak to Emma Burr Mountain.
We followed the top of the ridge for the most part, occasionally dropping down a bit on the west side to avoid obstacles. Occasionally we followed a faint trail but for the most part this was off-trail hiking, often with significant rocks to climb over.
This is the view of the ridgeline and Tincup Peak looking from Tincup Pass. The bad news is that Emma Burr Mountain is not visible from this location.
Once we got on top of the ridgeline, we could see our actual objective of Emma Burr (see photo below). The saddle between Tincup Peak and Emma Burr dropped down more than I expected from viewing the topo map, so we soon realized that we’d have to lose substantial elevation and then climb to get it back. Oh, well.
View of Emma Burr Mountain from the Tincup Peak ridgeline.
Once on the summit of Emma Burr, I pulled out the 2m FM station and started calling CQ on 146.52 MHz. We had no mobile phone coverage at Tincup Pass but once we got on the ridge, Verizon was working pretty well so I spotted us on Sotawatch. Our best DX was Dave/N0KM near Center, CO for a distance of 70 miles. Other stations worked: W0BV, W0RW, N1TEW, K0MGL, K0TG, KB0QEP, KL7GLK, N0EVH, KD0VHD and W0DLE. Lots of stations on 2m FM that day. I tried working W0RW on 1.2 GHz FM but we could not quite make it. I definitely heard him right at the noise floor but my 1 watt signal was not readable on his end.
Bob/K0NR working 2m FM with a 3-element yagi on Emma Burr Mountain.
My GPS app on the smartphone says that the one-way climb is 2.4 miles with 1600 vertical feet. The elevation difference between Tincup Pass (12,154) and Emma Burr (13,538) is 1384 feet, but the saddle costs you another 300 vertical feet of climbing.
Overall, it was a great day in the mountains. We knocked out two 13ers in one day and did a first SOTA activation. However, the wind pounded us quite well so we were plenty tired when we got back to our vehicle.
While exploring northwest Wyoming, Joyce/K0JJW and I were looking for a suitable mountain for a Summits On The Air (SOTA) activation. A little bit of research identified Pass Benchmark (W7Y/TT-122) as a good option. This summit is accessed from the Teton Pass trailhead, which is on a paved road (Route 22) heading west out of Jackson. There is substantial parking available at the pass and it appears to be a popular trailhead for hikers and mountain bikers.
Bob/K0NR and Joyce/K0JJW hanging out on the summit of TT-122.
The sign at the trailhead refers to this summit as Mount Elly, but I have not found that name on any of my maps or other sources. SOTA refers to it as “Pass Benchmark”.
The sign at the Teton Pass trailhead shows an overview of the trails in the area.
We hiked south from the pass on an obvious gated road which later turns into a trail. We encountered several groups of hikers and mountain bikers so the trail definitely gets used and is in good shape.
The red line is our actual hiking track, which shows a few switchbacks not indicated on most topo maps.
We followed the trail past a radio site (and checked out the various antennas). The good news is the radio site is not on the SOTA summit, so not much chance of radio interference.
A typical section of trail.
We continued south on the trail until we were due west of the summit. There is a marker there for the Black Canyon Trail, which leads off to the south. Don’t follow this trail, instead turn left (east) towards the summit. A few switchbacks will get you to the top in good shape. The one-way distance for the hike was 2 miles with 750 feet of elevation gain. Very pleasant.
On top, we started calling on 146.52 MHz with the Yaesu FT-90 putting 30W into a 3-element yagi antenna. We both worked Sam/WY7EM, Jim/K7AVL and Mick/W7CAT on 2m fm. We also caught WY7EM and W7CAT on 446.0 MHz. Thanks for the QSOs!
This was the first activation for this summit but given its easy access and inviting trail, I’m sure there will be more.
It is always fun to do the first Summits On The Air (SOTA) activation of a peak. Most of the Colorado peaks have been climbed by someone along the way but there are still many that have never been activated for SOTA using amateur radio.
Bob/K0NR takes shelter from the wind behind the rocks on the summit of 12306.
I noticed that an unnamed summit not too far from our cabin, referred to as 12306 or W0C/SR-129 had not been activated. At first glance, I thought this was because it was difficult to access. Further investigation revealed US Forest Service info on the Hayden Gulch Road (FS 396) that goes to the Hayden Gulch Trailhead at the west edge of the Buffalo Peaks Wilderness area.
Note that this area is closed to motor vehicles seasonally.
Joyce/K0JJW and I approached the trailhead from the west, starting at Granite, CO on Hwy 24, turning east onto FS 397 (marked at the highway) and then quickly looking for signs for FS 396. The San Isabel National Forest map is somewhat helpful but the Latitude 40 recreational map for Salida/Buena Vista is much better. The road is mostly easy 4WD but it is narrow in many places and moderate difficultly in a few spots. We saw crossover SUVs carefully driving the road with success. It was easy-peasy in our Jeep Wrangler.
The trailhead sign at the edge of Buffalo Peaks Wilderness.
Starting the hike, we followed the Hayden Gulch trail to the east. We actually had to search a bit to make sure we were really on the trail as we left the trailhead, as it was not super obvious. Hint: stay to the north (left) of the trailhead sign.
Our GPS track followed the Hayden Gulch trail into the wilderness area, then diverted north toward the summit.
The trail follows an old road that was likely closed when the wilderness area was formed. Once we cleared the trees (shown accurately on the map above), we left the trail and traveled off-trail towards the summit, trying to follow the contour lines and not lose a bunch of elevation. The hike promised to be very pleasant except that we had 30 to 40 mph winds from the west. This was not enough to stop us but certainly made the hike less enjoyable. The views were spectacular but a little difficult to enjoy with the wind blowing.
Our first view of SR-129 from the Hayden Gulch Trail, just as we emerged from the trees.
The hike was 1.8 miles one-way with about 1000 feet of vertical gain. Once on the summit, we got out the standard VHF SOTA gear: Yaesu FT-90 transceiver, LiFe battery and 3-element Arrow yagi. We both quickly worked Bob/W0BV, Walt/W0CP, Steve/WG0AT and Brad/WA6MM. WG0AT was on his way down from Eagle Rock (W0C/SP-113) so we missed a Summit-to-Summit opportunity with him. (We did work him earlier when he was on the summit but we were not.) WA6MM was a successful S2S contact from Mount Logan (W0C/FR-017).
This turned out to be a successful activation and a fun hike. We both concluded that we need to do it again…with a little less wind.
I’ve been up Pikes Peak (W0C/FR-004) a zillion times via the Pikes Peak Highway and the Pikes Peak Cog Railway (currently out of service) doing SOTA activations, working VHF contests, participating in the Colorado 14er Event, maintaining repeaters and escorting visitors from out of town. See my previous post on activating by driving up the mountain: How To Do a SOTA Activation on Pikes Peak.
Joyce/K0JJW and I had Pikes on our SOTA activation list for 2018 but wanted to do a hike to access the summit. The classic climbing route up Pikes is via Barr Trail, a 13-mile trail that ascends 7800 vertical feet. This is a difficult climb for most humans but I will note that serious runners routinely run up the mountain just for fun. See Fred/KT5X’s comments on the SOTA database about running up the mountain and then doing a SOTA activation.
Another hiking alternative on the northwest side of Pikes Peak is the Crags Trail, also known as the Northwest Slopes route. This route starts about 4 miles south of Divide, CO at the Crags Campground. This hike is 7 miles one-way with 4300 vertical feet. This is easier than Barr Trail but still a significant climb.
The hiking route from Devils Playground to the summit of Pikes Peak.
Devils Playground
There is a shorter option that does not get much attention (except from some of the locals). The Northwest Slopes route crosses the Pikes Peak Highway at Mile 16 at a popular spot called Devils Playground. There is a large parking area there and the Northwest Slopes trail can be accessed at this point. Just cross the road, step over a cable fence (intended to block vehicles, not people) and follow the obvious trail to the summit.
Note: currently access to the summit by car is restricted due to summit house construction and Devils Playground is a staging area for free shuttle buses that take visitors to the summit.
This trail is 2.6 miles one way and 1300 feet vertical (mostly uphill but some up and down action). The last quarter mile before the summit is rocky and steep. The trail becomes more difficult to follow at this point but careful attention to the cairns will keep you on the right path. As shown on the map, this trail tends to stay close to the road so you will see vehicles along the way. All in all, this was a nice hike on a good trail.
Once on top, we set up our standard 2m FM station: Yaesu FT-90 and the Arrow 3-element yagi antenna. We quickly had a pileup on 146.52 MHz. It is kind of crazy up there when everyone starts calling because you are hearing everyone but the chasers are not.
Bob/K0NR using the Alinco HT and the PC board yagi to make a 1.2 GHz radio contact.
It was great to work Steve/WG0AT on Mt Herman (W0C/FR-063) and Brad/WA6MM on Mount Morrison (W0C/FR-092). I also worked Paul/W0RW on 1.2 GHz with my Alinco HT driving a two-element yagi PC-board antenna. (A quick comparison between the rubber duck and the yagi confirmed that the yagi does have some gain.) We ended up in a bit of a hurry as the clouds moved in but tried to work everyone we could. Our best DX on 2m FM was Dave/N0KM near Del Norte, about 100 miles away. On our way down, the clouds were in and out but no storms or lightning.
All of the usual warnings apply for hiking above treeline: start early and get off the mountain before the storms move in.
This photo of Mount Princeton was taken in spring time with plenty of snow still on the summit.
For the Colorado 14er Event, Joyce/K0JJW and I decided to activate Mount Princeton (W0C/SR-005). I had climbed this summit many years ago, well before Summits On The Air (SOTA) was a thing. Princeton is a majestic peak that towers over Buena Vista and the surrounding area. We see that mountain quite often when we are up at the cabin, so I kept thinking it would be great to activate it for SOTA. Despite it being a popular 14er, it had only been
activated 2 times before (now 4 times with Joyce and me).
Hiking route to Mount Princeton shown on map (click to enlarge).
For complete information on climbing this summit, spend some time studying the 14ers.com web site. You will see references to the upper trailhead and the lower trailhead. A 4WD road leads to the upper trailhead which is where we started our hike at 11,800 feet. The lower (or main) trailhead is way down at the bottom (8900 feet) which makes for a much longer hike. Also, you end up hiking on the road, which tends to be boring.
The Road
The 4WD road is mostly “easy 4WD” with some challenging spots inserted along the way. It was no problem to drive the road with our Jeep Wrangler. A crossover-style SUV would have trouble in several spots but can probably make it with very careful wheel placement. The road has sections that are very narrow, so be prepared to back up if you meet someone coming from the other direction. We parked very close to the upper trailhead, just pulling off to the side of the road, but there is not much room there. There is a lot more parking near the communications towers shown on the map but you have to hike another mile or so on the road. We made sure we had a parking spot by arriving at the upper trailhead at 5:30 AM; we were the first ones there.
Joyce/K0JJW on the trail to Mount Princeton.
The trail starts out very distinct and is easy to follow. Later, the terrain turns to talus (fields of large rocks) which continues for the entire climb. In some spots, the trail fades and is difficult to follow. Even when you are “on the trail” you get to do a lot of rock hopping. There is a reason they call these the Rocky Mountains. By my GPS app, the distance was 2.1 miles (one way) with 2360 vertical feet.
Summits On The Air
For radio operating, we focused on 2m FM using the Yaesu FT-90 Transceiver with LiPo battery, putting out 30W into a 3-element Arrow yagi antenna. I did have my very first DMR SOTA contact with Terry/KE0HNW, using my Tytera MD-380 handheld on 70 cm. I also made a few calls on 446.0 MHz but never got a reply.
Obligatory summit photo of Joyce/K0JJW and Bob/K0NR.
Here’s my log…Joyce’s is about the same but with fewer QSOs.
UTC   Band  Mode Callsign
15:38 144MHz FM KD0VHD mobile
15:40 144MHz FM KS0E Jefferson
15:42 144MHz FM KI6YMZ Maroon Peak (W0C/WE-002)
15:46 144MHz FM N0MTN Mt Sherman (W0C/SR-061)
15:47 144MHz FM K0ETT Huron Peak (W0C/SR-010)
15:48 144MHz FM WA6MM Mt Bierstadt (W0C/PR-015)
15:49 144MHz FM KN0MAP
15:50 144MHz FM KD0YOB on his way up Mt Flora
15:53 144MHz FM KE0HNW
15:54 144MHz FM KE0RMY
15:55 433MHz DV KE0HNW My first SOTA DMR contact
15:57 144MHz FM W0AJO
16:17 144MHz FM K0BLL Mount Belford (W0C/SR-006)
16:30 144MHz FM W0ASB Mount Antero (W0C/SR-003)
This extra large cairn (trail marker) is placed such that you don’t miss an important turn.
We worked six other mountaintop stations, all of them 14ers. I also worked a few more summits on our way down the mountain but we were outside the activation zone, so I submitted those as a chaser log.
Mosquito Pass is a popular 4WD road in Colorado that takes you to 13,185 feet in elevation. It also provides access to two excellent SOTA summits, both over 13k feet: Mosquito Peak (W0C/SR-068) and London Mountain (W0C/SP-025). Joyce/K0JJW and I activated both summits on the same day. Fortunately, the weather cooperated nicely.
K0NR operating 2m FM on the summit of London Mountain.
The Road
We drove the road to the pass from the east (via Highway 9, heading north out of Fairplay then turning west onto County Rd 12 / Mosquito Pass Road). Consult the Pike National Forest map for more detail.
We’ve driven over this pass many times over the years and the condition of the road has varied quite a bit. Right now, I’d call this a moderate 4WD road. You will find trail descriptions online that call Mosquito Pass “easy 4WD” but I think that information is out of date. Our stock Jeep Wrangler had no problem with it but I would not recommend driving the road with a Subaru-class crossover SUV.
Map of the area shows driving tracks in orange and hiking tracks in blue.
Be aware that this road is closed by snow early in the fall and opens late in the summer. It is very unlikely to be passable in June and typically opens sometime in July. We decided to wait until August. Did I mention the road exceeds 13,000 feet in elevation? Check BushDucks for usually reliable pass information.
Mosquito Peak (W0C/SR-068)
Mosquito Peak as seen from the summit of London Mountain.
At Mosquito Pass, we took an unmarked 4WD north towards Mosquito Peak. This road is not shown on the Pike National Forest map. The road was in good condition but is a narrow shelf road with limited opportunities to turn around. We parked the Jeep at an obvious turn-around spot and hiked on up the south ridge to the summit. No consistent trail, but a few cairns here and there. The one-way distance was about half a mile with 500 feet of vertical gain, so not very difficult.
It was quite windy on top so we hunkered down behind some rocks to provide some shelter. Using the Yaesu FT-90 transceiver and the 3-element Arrow 2m yagi, we worked these stations without much trouble: W0BV, N0EMU, KN0MAP, W0DLE, KD0VHD and W9GYA. Our best DX was N0EMU near Calhan, CO at about 100 miles.
London Mountain (W0C/SP-025)
London Mountain as seen from Mosquito Peak. Note the Mosquito Pass road at the bottom of the mountain. Our hiking route followed the top of the ridge starting from the right (west side).
To hike London Mountain, we drove back down the pass to the west end of the mountain and parked the Jeep at the point another 4WD road heads off to the south (see map). This road was gated closed and marked “no trespassing”.
We followed an obvious but unmarked trail leading from this small parking spot up the ridge of London Mountain. For the most part, we were able to follow this trail all the way to the summit. In a few spots it faded out but we stayed near the top of the ridge and always found it again. There were times when we really wondered if the trail’s route was the best option but it worked out fine. There are a few steep sections and places where we used our hands on rocks. The variety of rocks on this mountain (including marble) made it an interesting and fun hike. Following the top of the ridge also provided some ups and downs and many small false summits. The one-way distance is 0.85 miles with 600 vertical feet.
On top, we worked W0BV, W0DLE, N0EMU, KC0PBR, KN0MAP and KL7GLK on 2m FM. The wind dissipated a bit so it was more pleasant to hang out on this summit. We left the summit around 1 pm local with blue skies and a few puffy clouds all around.
Joyce/K0JJW and Bob/K0NR hanging out on London Mountain.
These two summits are a great double-summit opportunity, as long as you have a capable 4WD vehicle. I suppose you could hike up the road but you probably can’t do both of the summits in one day.
Time: Saturday Sept 15 and Saturday Sept 22 (8 AM to 5 PM) 2018
Location: Black Forest Fire Station 1 (intersection of Burgess Rd. & Teachout Rd., Black Forest, Colorado)
Sponsored by the Tri-Lakes Monument Radio Association
The FCC Technician license is your gateway to the world-wide excitement of Amateur Radio, and the very best emergency communications capability available!
Earn your ham radio Technician class radio privileges
Pass your FCC amateur radio license exam right in class on the second day
Multiple-choice exam, No Morse Code Required
See live equipment demonstrations
Learn to operate on the ham bands, 10 Meters and higher
Learn to use the many VHF/UHF FM repeaters in Colorado
Find out how to participate in emergency communications
Here are some operating tips that I have found useful when doing Summits On The Air (SOTA) on VHF. I’ve been using VHF and higher frequencies for SOTA exclusively and have activated over 100 summits in Colorado (and other states such as California, Wyoming, New Mexico, North Carolina and Tennessee.)
The challenge with VHF and higher is that the radio range is limited compared with HF. (It really does help to bounce those signals off the ionosphere.) VHF propagation will vary depending on a lot of factors but for SOTA activations our range is typically 50 to 100 miles. In the backcountry of Colorado, a 50 mile radius may not include very many active radio amateurs, so you may come up short in terms of radio contacts. For your first activation(s), you may want to stay close to a metropolitan area.
Next, here are some additional tips to having a successful activation:
Send Invitations
Get the word out to people that may be within range. I try to keep track of who I’ve worked in the past or know to be in a particular area and let them know when I’ll be activating. In some cases, I’ll go ahead and make a specific sked with a station. That is, we’ll meet on a particular frequency at a particular time, perhaps on CW or SSB for maximum weak signal performance.
Create an Alert and then Spot yourself on the sotawatch.org web page (using smartphone app).
Make Your Call
By the rules, SOTA contacts are always simplex, so on 2 meters the place to try is usually 146.52 MHz, the National Simplex Calling Frequency. (Some areas have established other 2m simplex frequencies to use for SOTA, so inquire locally.) This is the place to try calling.
Who are you going to find there? Hard to say. SOTA chasers will often listen to “five two”…that’s where they find SOTA activators. Also, there are radio hams that just like to hang out on 52…they like 2m FM operating but they don’t like repeaters so they listen here. You will also find that many mobile stations monitor 146.52 as they drive through rural areas. Basically, they are listening for anyone around but aren’t flipping from repeater to repeater as they change location. I’ll often hear 4WD enthusiasts, hikers, boaters, campers, etc. using Five Two.
We usually say something short and sweet one operating FM repeaters (“K0NR Monitoring”) but for SOTA we need to make a longer call. Realize that not everyone knows about SOTA so they may not know what the heck you are doing. Make a call such as this: “CQ CQ this is Kilo Zero November Romeo operating from Pikes Peak – Summits On The Air – anyone around?” Or “CQ 2 meters this is K0NR on Pikes Peak – Summits On The Air.” Do a little bit of “selling” when you make your call. Sound like you are having fun.
Sometimes people have their radios to set to scan multiple frequencies with 146.52 MHz set as one of the channels. If your transmission is too short, they will miss it. Also, it is helpful to mention the frequency you are calling on…sometimes I’ll say “CQ Five Two This is Kilo Zero November Romeo…”
Be Patient
Be patient. Sometimes it just takes time to accumulate your 4 QSOs to qualify for activator points. The few times I have been skunked on QSOs were when I did not have enough time, usually because storms were moving in. Keep calling every few minutes, taking a break once in a while to enjoy the view.
Try Other Frequencies
You may want to try other simplex frequencies, so know the band plan for the area you are activating in. Another trick is to get on a local 2m repeater and ask for someone to move over to simplex to work you. I have not had to do this very often but it does work. Have some of the local repeaters programmed into your radio.
Most of the SOTA VHF activity is on the 2 meter band, so that will be the “go to” band for most activations. However, it is fun to try other bands such as 6m and 70cm. I’ve been playing around with 1.2 GHz also (23 cm).
Improve Your Station
Hopefully by now you know that using an HT with a rubber duck antenna is a bad idea. Get at least a half-wave vertical or roll-up j-pole antenna. Better yet, get a small yagi antenna to add 5 or 6 dB to your signal. It can make a big difference on who you can work. I’ve even started carrying a small 2m/70cm transceiver to get my 2m transmit power up to 30W. The objective is to extend your operating range.
Another angle is to use SSB and CW, which are much better for weak signal performance (compared to FM). This sets you up to work the serious VHF stations which tend to use these modes and have large high-gain antennas (horizontally polarized). Think about extending the range of your communications from a 50 mile radius to 200 miles, what a difference! (My best 2m distance on SOTA is 229 miles, using 2m CW on Capulin Mountain.)
Most of our Summits On The Air (SOTA) activity is here in Colorado but every once in a while, Joyce/K0JJW and I get the opportunity to branch out to other locations. It’s a fun thing to do with SOTA…do a little hiking, sightseeing and ham radio operating. On this trip, we decided to visit the Black Hills region of South Dakota, a place we had enjoyed many years ago.
Bob/K0NR operating 2m FM using a Yaesu FT-90 driving a 3-element yagi antenna.
Our general approach was to identify a list of SOTA summits that were not too difficult, with reasonable activator points (>6) and in locations we wanted to visit. (One good method is to use the SOTA database to sort summits by points, then look for ones that have been activated the most. Those are usually easy to access.) I noticed that Gary/KT0A had activated all of the summits on my list so I emailed him and received some great advice. Gary has also provided most of the activation notes in the SOTA database, which proved to be helpful. Thanks, Gary.
We use VHF and UHF exclusively for our SOTA activations, so I was a bit concerned about whether we’d find enough VHF activity in the area. Typically, we can work 100 miles or so on 2m FM from a summit without too much trouble but if no one is out there, it’s kind of difficult to make radio contact. South Dakota is not the most populous state, so it was a concern.
We spent three days in the western South Dakota area: did three summits the first day, three summits the second day and two summits the third day. The Black Hills are about a 6 hour drive from the Denver area, which makes for a good SOTA destination from Colorado.
Hey, wait a minute, this one is in Nebraska, not the Dakotas. It turns out Nebraska (W0N) has 15 SOTA summits, most of them in the pan handle of the state. Scotts Bluff (4649 feet) is located in Scotts Bluff National Monument and has historical significance as an important landmark on the Oregon Trail. This is an excellent example of the SOTA program providing that extra incentive to visit a new location that we otherwise would have skipped.
Joyce/K0JJW, Bob/KC0OZ, Bob/K0NR and Leeloo on the summit of Scotts Bluff.
We drove to the parking lot near the summit followed by a short hike to the actual high point. (You can hike up from below if you’d prefer more of an ascent.) We ran into Bob/KC0OZ who is a volunteer at the national monument (and his dog Leeloo). I wasn’t sure how much VHF activity I would encounter on a weekday but we found quite a few friendly folks lurking on 2m FM in the area. I think Bob knew everyone that we worked on the 2m band.
Inside Wind Cave National Park, Rankin Ridge is a 1-mile (200 feet vertical) loop trail in good condition, providing an easy hike to a lookout tower. (The lookout tower was marked “no entry”.) This was a very enjoyable hike and should be on the “must do” list for this area.
Mount Coolidge is a drive-up summit (good gravel road, 2WD), easily accessible from Highway 87 in Custer State Park. It is the site of an historical rock lookout tower which is now encroached on by many radio towers. The Custer State Park web site says the road to Mount Coolidge is generally open 9 am – 5 pm from Memorial Day into late September.
Mount Coolidge lookout tower
This summit is easy to access and provides some very good views of the Black Hills. Even though I’m a fan of radio towers and antennas, the way they surround the historic lookout tower really detracts from the summit. Don’t come here expecting a wilderness experience.
At 7210 feet, Odakota is the second highest summit in South Dakota. This summit is a relatively easy bushwhack hike through grass and over some downed timber, less than a 1/2-mile in distance and only 100 feet vertical. You’ll want to have the Black Hills National Forest map guiding you to this summit. Actually, that map is useful for all of these summits in South Dakota.
Bob/K0NR cranking out CW on the 2m band using the FT-817.
Next up was Bear Mountain, another summit that has a lookout tower now accompanied by radio towers. (Not as bad as Mount Coolidge.) There is a good gravel road to the summit suitable for 2WD vehicles. Again, the Black Hills National Forest map is a great resource for access information.
This summit was a reasonable bushwhack hike with lots of tall grass and significant downed timber. My GPS app measured the distance at 0.45 miles with 450 feet vertical.
Joyce/K0JJW standing near the summit of Atlantic Hill.
We followed KT0A’s instructions from the SOTA website which took us to the west side of Atlantic Hill. Again, use the Black Hills National Forest map for guidance. The map below shows the road as “297 1G” but it was just labeled “G”. Also, note that the road is gated closed for part of the year. The “G” road looked a bit sketchy but turned out to be easy to navigate with our crossover SUV. The map below shows the track we took. There was no trail and at times the grass was very tall. All things considered this was a good hike and the summit is quite pleasant.
Cicero Peak has a rocky road (FS 338) to the summit, OK for high clearance 2WD vehicles. There’s a small radio site at the summit. The views are probably wonderful but we did not see any because of the low hanging clouds when we were there. This road also has a gate at the bottom and is closed seasonally.
Custer Mountain was the toughest hike of the trip…a bushwhack through tall grass, downed timber and plenty of rock near the summit. Actually, the worst part was the swarms of gnats that followed us everywhere — they were out in full force after some rainy weather. Actually, I think it was the gnats that wore us out…difficult to step over rocks and logs when you’re swatting the little buggers.
Bob/K0NR on the summit of Custer Mountain.
Again, we followed KT0A’s activation notes on the SOTA web site. There is really no “good” way to ascend the mountain but the map below shows the track we used to descend the mountain. It has a few less rocks and downed trees to climb over. The key is to approach the summit from the west/northwest. The distance recorded on my GPS app was 0.83 miles and 650 feet vertical.
Hiking route up Custer Mountain.
Radio Operating
Our radio gear varied from summit to summit but we always carried a Yaesu FT-90 2m/70cm transceiver, an Arrow 3-element yagi for 2m, dualband j-pole for 2m/70cm and a gaggle of handheld transceivers. On most of the summits, we also had the FT-817 so we could work CW/SSB on 2m and 6m. As usual, most of the contacts were on 146.52 MHz FM, using the FT-90.
NC0K and W0FUI were listening a lot and worked us on 5 summits, KE0LXT snagged us on 4 summits (and met us in person on Bear Mountain). We worked KD0UST from 2 summits.
Our longest distance QSOs were with Jim/WD0BQM in Mitchell, NE (grid DN81cw). From Scotts Bluff we both worked Jim on 2m FM at relatively short range. On Odakota Mountain, we worked Jim/WD0BQM in Mitchell, Nebraska (Grid DN81cw) on 2m at a distance of 139 miles. I initially worked Jim on CW with very good signals. Joyce also worked him on SSB but she had to work a bit to complete that contact. From Bear Mountain, I worked Jim on 2m CW again with some difficulty because signals were clearly weaker but Joyce was not able to complete using SSB. Thanks for getting on the air with us, Jim!
I made one 6m ssb contact with K0CX from Bear Mountain. Other stations worked during the trip: KC0WVE, N8XBD, WB0VAO, KB0ZXH, KL7MH, N0SQ, W0SSB, KD0QDG, KD0ZIP, AF0DJ, KD0ZIR, W0NIL, W7REA, K0CX, WB0PZQ, N0DUX, N0DUW, KC0GWU, W3MEB, W7LFB, W0LFB, KF0XO. We managed to make at least 4 QSOs on each summit without too much difficulty by calling on 146.52 MHz. On Custer Mountain, we got impatient and went over to the 146.85 MHz (Bear Mountain) repeater to beg for a simplex contact. Thanks, KF0XO.
It was a great trip to a beautiful part of the western United States. We met some really nice hams along the way. Thanks to everyone that took the time to work us on the summits.
This view of Signal Butte shows the classic conical shape of the summit.
Signal Butte (W0C/FR-165) is a popular Summits On The Air (SOTA) summit about 8 miles north of Florrisant, Colorado. Joyce/K0JJW and I had this one on our SOTA list for a while now and finally got around to activating it. At an elevation of only 9459 feet, it is not a big mountain but it provides a spectacular 360 degree view of the surrounding area. Signal Butte is within the Hayman Wildfire burn area from June 2002 and you can still clearly see the effects of that fire.
The well-established trail starts at the end of FS 362A. The red line shows our hiking route as recorded on my GPS app.
To get to the trailhead, consult the USFS Pike National Forest Map. Drive to the trailhead using FS 362, then turning onto FS 362A which leads to a well-used parking area. These roads are easy-peasy 4WD and high-clearance 2WD is probably sufficient.
This is the view of Signal Butte from the trailhead.
The well-constructed trail is only a half mile long and 540 feet vertical, with many tight switchbacks and rock steps. I’d call this a good visitor hike because it will get most people huffing and puffing so they feel like they really did some climbing but then reward them with outstanding views on top.
A look at a typical section of trail with Pikes Peak in the distance.
On the Air
We both operated mostly on 2m FM (146.52 MHz) with the Yaesu FT-90 cranking out 30W into an 3-element yagi antenna. The best DX for the day was Dave/N0KM about 107 miles away in the San Luis valley (DM67vr). Note that our signals had to find their way across several mountain ranges for us to make contact. Who says VHF is only line of sight?
Steve/WG0AT showed up on Mount Herman (W0C/FR-063) for a summit-to-summit SOTA QSO. Then later, Doug/KD5OUG called us from the summit of Mount Evans (W0C/FR-003) for another summit-to-summit contact. Apparently Doug was just playing tourist and decided to pull out his 2m HT and give a call. Thanks to these stations that contacted us: K0LJW, W0RW, WG0AT, KC0PBR, K0MGL, KD0MRC, N0KM, N0EMU, KD0VHD, K0PV, K0PWO, W0BV, WB0TGE, K0GPA, K0TPC, WZ0N, KD0OUG
Bob/K0NR cranking out the 2m FM contacts with Pikes Peak in the background.
As you can see from the photos, the weather was excellent so we really enjoyed the activation. We both had a great time with it and we will undoubtedly be back. This SOTA summit is highly recommended because of the easy access, reasonable difficulty, established trail and excellent radio and optical horizons.
Amateur Radio operators from around Colorado will be climbing many of Colorado’s 14,000-foot mountains and Summits On The Air (SOTA) peaks to set up amateur radio stations in an effort to communicate with other radio amateurs across the state and around the world. Join in on the fun during the 27th annual event and see how many of the mountaintop stations you can contact. The covers the entire weekend but many mountaintop activators will hit the trail early with the goal of being off the summits by noon due to lightning safety concerns.
Now including Summits On the Air (SOTA), which adds over 1700 potential summits! If you aren’t up to climbing a 14er, there are many other summits to choose from (with a wide range of difficulty). See the Colorado SOTA web page at w0c-sota.org
Radio operators who plan to activate a summit should post their intent on the ham14er Yahoo Group. To subscribe to the “ham14er” email list, visit the Yahoo groups site at http://groups.yahoo.com/group/ham14er/ . Also, be sure to check out the event information at http://www.ham14er.org It is also a great idea to post an ALERT on the SOTAwatch.org website.
Frequencies used during the event Activity can occur on any amateur band including HF and VHF. The 2m fm band plan uses a “primary frequency and move up” approach. The 2m fm primary frequency is 147.42 MHz. At the beginning of the event, operators should try calling on 147.42 MHz. As activity increases on that frequency, move on up the band using the 30 kHz steps. Don’t just hang out on 147.42 MHz…move up! The next standard simplex frequency up from 147.42 MHz is 147.45 MHz, followed by 147.48 and 147.51 MHz.
Frequency (MHz)
Comments
Frequency (MHz)
Comments
147.42
Primary 2m FM Frequency, then up in 30 kHz steps
7.032
40m CW Frequency
147.45
Alternate 2m FM frequency
7.185
40m SSB Frequency
147.48
Alternate 2m FM frequency
10.110
30m CW Frequency
147.51
Alternate 2m FM frequency
14.060
20m CW Frequency
446.000
Primary 70 cm FM frequency
14.345
20m SSB Frequency
446.025
Alternate 70 cm FM frequency
18.092
17m CW Frequency
1294.50
Primary 23cm FM frequency
18.158
17m SSB Frequency
144.200
2m SSB calling frequency
21.060
15m CW Frequency
50.125
6m SSB calling frequency
21.330
15m SSB Frequency
28.060
10m CW Frequency
Other Bands/Modes
Standard calling frequencies and/or band plans apply.
28.350
10m SSB Frequency
Warning: Climbing mountains is inherently a dangerous activity.
Do not attempt this without proper training, equipment and preparation.
While on a canyon country hiking/Jeeping trip in Utah, Joyce/K0JJW and I decided to do a couple of Summits On The Air (SOTA) activations. Abajo Peak (W7U/SU-014) showed up as a suitable target, being an easy-access drive-up summit at 11,360 feet, just west of Monticello. While the forest service map shows this as a 4WD route, it turned out to be a well-maintained road that most 2WD vehicles can handle.
The radio site on the summit of Abajo Peak
The map below shows the area. The only real challenge was finding B102 heading south/southwest out of Monticello. This later turns into route 0087, which swings south of another SOTA summit: South Peak (W7U/SJ-003) and up over Dickson Pass. (South Peak could be a second summit for a double activation.)
Abajo Peak is an excellent summit for VHF/UHF propagation with a good radio horizon in all directions. There is a substantial radio communications site on top which did create some local interference on 2m and 70cm. Moving a bit away from the actual summit caused the interference to mostly disappear.
I was concerned that we would not find enough activity on VHF in this rural location, so I put the word out to some of the hams in Utah and western Colorado with capable 2m SSB stations. Our equipment was a Yaesu FT-817 (all mode, 5W) driving a 3-element yagi antenna. We also had a 50W Yaesu FT-90 that can provide a bit more power out on 2m FM. And we had the usual collection of HTs.
The longest distance contacts for the day plotted on a map (click to enlarge).
Around noon, we started calling on 146.52 MHz and worked N7VWX in Nucla, CO (about 57 miles away). We switched over to 144.200 SSB and worked W0DSW in Cedaredge, CO (113 miles). Then we worked Bill/K0UK in Grand Junction (95 miles) on 144.200 SSB…not real strong but we made it. A bit later we came across KB7REB on 146.52 FM who said he was out hiking in a canyon and was surprised to hear anyone. We also worked KB7TRA on 146.52 (I think he was mobile east of us). We also worked W0DBB in Montrose, CO. I kept beaming to the west looking for W7DHH and I eventually heard him calling on 144.200 CW. I tried getting back to him but he was apparently not hearing me. N7KMK (same vicinity as W7DHH) came on the air and I was able to copy him on SSB. He also had trouble hearing me, but for a few seconds the signals came up a bit and we made the contact. N7KMK was my best DX for the day at 154 miles.
Four contacts are required to get the SOTA activation points and we probably would have been successful just randomly calling on 146.52 MHz FM. However, taking along the SSB transceiver and alerting the 2m weak-signal crowd certainly paid off with some longer distance QSOs. It is always a blast to be working over 100 miles on VHF QRP.
Back in the summer of 2013, I did the first Summits On The Air (SOTA) activation for W0C/SP-094. This is an unnamed summit (10350) near Trout Creek Pass not far from our cabin. Although I did activate it, I only made two radio contacts from the summit (so no activator points awarded). A thunderstorm had moved in and I decided to abandon the effort. Actually, I don’t recall much from that activation other than getting skunked due to weather.
Joyce/K0JJW on the summit of W0C/SP-094
So today, Joyce/K0JJW and I returned to the summit to set things right. Following Walt/W0CP’s suggestion, we drove the Jeep from the south (Hwy 24) taking FR 305 to FR 376 and parked just off the road at 38.86967, -106.03146. FR 305 is a good 2WD gravel road; FR 376 is easy 4WD (or high clearance 2WD). (Be aware of the seasonal road closures from Dec 1 to April 15.) A winter storm warning was in effect the night before we hiked, so I wondered if the weather was going to win again. As it turns out, we had 3 or 4 inches of new snow on the ground which was not a problem.
Hiking route shown in blue.
From the parking spot, the hiking route is not critical. Just head for the summit. We decided to swing slightly to the east which gave us a little less slope. It also provided us a nice walk across the top of the ridge that extends out to the southeast. As you can see from the photo, the summit is flat with a reasonable number of trees. Round trip distance is 1.5 miles with 700 feet of vertical. Easy peasy.
Once on top, we called on 146.52 MHz and worked Bob/W0BV, Skip/W9GYA, Jim/KD0MRC, Walt/WZ0N, Dave/N0KM and Ken/WA6TTY. We also made a couple of 446.0 MHz contacts with some of the same stations.
Summit-to-Summit
Earlier, as we left for the trailhead, I got an email from Steve/WG0AT that he was headed up Mt Herman (W0C/FR-063). This sounded like a great summit-to-summit opportunity! I figured we’d need our best 2m fm station, so I got out the Yaesu FT-90 and the Arrow 3-element yagi. I saw him spotted on SOTAwatch so I called him multiple times on 2m fm. Finally, I heard someone else talking to him on 146.52 which caused me to swing the antenna back and forth. Sure enough, I could hear him…barely…with the antenna pointed way south of his location. This often happens in the mountains…the direct path is not always the best path on VHF. I just barely worked Steve and got him in the log.
We stayed on the summit for a while, enjoying the view of Mt Princeton, then hiked down. It was a wonderful activation…much better than the first time.
I came across this story in my archives, written by me way back in August 1992. This was before mobile phones were commonly available, so ham radio turned out to be critical in this incident. Even today, there are many places in the Colorado backcountry where mobile phones don’t work but amateur radio can communicate. My callsign at the time was KBØCY
Something happened on the way to Uncompahgre Peak on August 8, 1992.
Around noon, my brother, my two nephews and I made it to the summit and had just signed the log. I called on 146.52 and contacted Chris, NQ5V, who was somewhere to the east of me (Creede, I think). This must be his summer location, since his callbook address is Texas. We talked about the trail up Uncompahgre, since he was interested in hiking it.
After I signed clear with NQ5V and was about to start down the mountain, a teenage boy came up to me and said he had been sent to “find the guy with the radio” because a girl had been hit by a rock down below and was hurt. I am not sure how they knew I had a radio, other than I used it once on the way up the trail. The story seemed rather sketchy and I was skeptical but asked NQ5V to standby on frequency because we may have a medical emergency. At that time, Arnold, W7JRC, from Cedaredge, CO, came on frequency and said he had a phone nearby. (NQ5V did not have a phone available.) A second, older teenager came up the the trail with more information. He said he was a pre-med student and had search and rescue experience. He had more detailed info which made the story more clear. At this time, I concluded that we had a real emergency and asked W7JRC to call the authorities. I handed my HT to the older teenager and had him describe the victim’s condition to W7JRC. W7JRC had some trouble contacting the police, but eventually got through to the Ouray County Sheriff’s Office. (It turned out we were in Hinsdale County, but we did not know that at the time.)
Jim, NR5Y (also close to Creede, I think) came on frequency and said that he was close to a telephone. I was not always able to communicate with NR5Y, so NQ5V relayed to NR5Y. Since W7JRC was having trouble with getting the telephone call through, I asked NR5Y to also try to place a call. He called the Mineral County Sheriff, who relayed to Hinsdale County. All this time, I was moving down the mountain to try to get closer to the victim without losing my radio contact. About this time, my HT battery went dead, so I switched to my spare (Good thing I had one!) As I moved onto the saddle below Uncompaghre, I lost contact with W7JRC and contact with NQ5V got much worse, but usable. About this time, Doug, NØLAY, came on the air and his signal was very strong at my location which allowed me to stay on low power and conserve my HT batteries. N0LAY apparently came on the air in response to a call from the Hinsdale County Sheriff. N0LAY also had a radio which was on the sheriff’s frequency and relayed information from me to the sheriff’s dispatch.
I had not proceeded down any further because I was certain that I would lose radio contact with NØLAY. The victim had several people with her that had First Aid training and was about 1000 feet below me at the bottom of a cirque. I sent the older teenager back down to the victim with instructions to signal me as to her condition. We both had signal whistles – two whistles meant her condition was the same (stable), three whistles meant her condition had deteriorated. After I got the two whistles back, I felt like things were going to be OK.
About that time, NØLAY relayed that an ambulance had been dispatched to the trailhead and a search and rescue person was on the way up the trail with a trail bike. Also, a helicopter had been dispatched from Montrose. It took us a little while to communicate to the sheriff where the victim was, but we had a pretty good topo map, so we eventually gave them an accurate fix on the location. As I was listening to NØLAY relay, I realized that my Kenwood TH-77A could receive most police frequencies. NØLAY provided me with the frequency and I programmed it into the HT, scanning between 146.52 and the sheriff’s frequency. This allowed us to listen in on what was going on. In fact, many times I was clearly hearing the various parties while they were having trouble communicating.
The S&R guy on the trail bike made it to the accident scene without us noticing him. He had parked his bike about half a mile away from us and had scrambled down to the victim. The first time I was aware of his position was when he transmitted from the accident site. He confirmed that the girl was pretty bashed up, but stable, and needed a helicopter ride out. About this time, the sheriff’s dispatch reported that the helicopter was about 5 minutes out (I think it turned out to be more like 15 minutes away). Soon the helicopter came up on the sheriff’s frequency and I could hear the S&R guy coordinating with the helicopter pilot The two-seater helicopter landed and they put the girl in the second seat. Apparently, she was stable enough to walk to the helicopter with some assistance. The alternative was to put her outside the chopper in a litter. The helicopter lifted off and set back down a few minutes later near the ambulance which was near the trailhead. The two-seater chopper was not a medical evacuation helicopter and the plan was that Flight-For-Life from Grand Junction would pick up the victim at the ambulance location. It turned out that Flight-For-Life was unavailable so they took the victim to a hospital by ambulance (to a local clinic, then Gunnison, I think).
We stayed on the ridge until the chopper headed for home, then we did the same. On the way down, the S&R guy on the trail bike caught up with us and we talked about the accident. He said the girl lost some teeth, had facial cuts, internal bleeding and swelling in the face, but was in stable condition. He said that without the radio report that they would be just getting the initial call at the time he was heading home. That is, we saved about 5 hours on the response time with amateur radio.
I have carried my HT on every 14er hike I have ever done and had considered the possibility of using of using it for emergency communications. I guess I never gave it too much thought because people venturing into the backcountry need to have a self-sufficient attitude. That means being prepared and preventing or handling any emergency situation on your own. But the unexpected happens, and here I was in the middle of a medical emergency. It certainly has caused me to take this emergency communications thing more seriously.
Things I learned that day:
Always carry an extra HT battery (or two)
Always carry a decent portable antenna (more than a rubber duck)
Always carry a good topo map, even if you don’t need it to follow the trail.
Make note of what county you are hiking in when in unfamiliar parts of the state. This aids in getting to the right Sheriff’s office. (This is important because the person you contact via radio is likely to be two or three counties away.)
My signal whistle (which has caused considerable abuse from a few hiking companions) is actually useful.
Extended coverage receive is very useful in emergencies. (I am still thinking about extended transmit — I clearly could have used it in this case.)
I was very pleased that everyone reacted quickly but in a professional manner. The radio amateurs all helped out when they could be stayed out of the way when appropriate. I am sure we can find some things that could have been done better, but I felt like things went well overall.
During a discussion of various VHF radios and antennas on the SOTA reflector, Phil/G4OBK recommended this antenna: TWAYRDIO RH 770 SMA-Male Dual Band Telescopic Handheld Antenna. I was mildly skeptical in that the antenna looks like cheaplowcost economy stuff from China. However, for $16.55 (free shipping), it seemed like something I should try out.
I’ve since used this antenna on several SOTA activations and have found it to work quite well. Not having to worry about whether I’m operating on 2m or 70 cm is a big plus. I liked the antenna so much, I now have three.
Recently, I wondered how well the antenna is really performing so I did a side-by-side comparison with the Smiley 2m halfwave. Now this kind of comparison is always a bit dicey unless you have a calibrated antenna range but simple comparisons are useful. I got on 2m fm with another ham running a home station some distance away such that I was not pegging his S-meter. We did several A/B comparisons between the Smiley and the RH 770. Much to my surprise, the RH 770 performed significantly better than the Smiley. That is, the other ham saw his meter deflect higher with the RH 770. I can’t give that to you in dB but I can say it’s a little better. I actually thought that the single-band design might win out due to less complexity in the antenna but the opposite was true. Your mileage may vary. No warranty expressed or implied.
The only thing I don’t like about the RH 770 is that the telescoping sections slide up and down really easy. Too easy for my taste. I’d rather have some stickiness to it so that I am sure it will remain fully extended. But I admit this is more of a personal impression than actual problem.
The antenna is available with a male SMA connector, a female SMA connector or a BNC. That should pretty much cover it.
So thanks Phil/G4OBK for pointing out this antenna. I also highly recommend it.
73, Bob K0NR
Nov 2025 Update: There is a newer version of this antenna, arguably better.
I’ve been referring to the VHF FM as the utility mode for quite a while now. I picked this up from Gary Pearce/KN4AQ when I inherited the FM column from CQ VHF magazine (no longer being published). Gary recently filled me in on the origin of this term, which he captured in his first FM column for CQ VHF.
Gary describes how he got hooked on VHF operating, especially 2m FM:
I’ve been a ham since 1965 (age 15). Today, I have an Extra class license, and I operate some HF (mostly SSB and digital, with cw limited to occasional bouts at Field Day). But since my first days as a Novice with a Heathkit Twoer, I’ve been a VHFer. I went through the 2 and 6 meter AM days with a Heath Seneca and Utica 650, and then SSB with a Gonset Sidewinder and Hallicrafter HA-2 transverter. But what really flipped my switch as an early ham was an old, single-channel Motorola 80D on 146.94 simplex, installed in the car of a teenage friend’s father. For you newer hams, this is an exercise in nostalgia that I don’t have space here to explain – I wish I could. I will note that the Motorola 80D was an FM radio that began life in a police car or taxi cab somewhere. It was a huge, heavy, all-tube radio that sat in the trunk and improved traction on the ice. Below the dash was a control head with volume, squelch, and the microphone and speaker.
It wasn’t long before I learned about repeaters, which enhanced the FM experience immeasurably (all four of them in the Chicago area at the time). My interest in VHF SSB waned…Getting involved in a local repeater group felt comfortable – this was someplace where I could really participate.
But then things shifted as time passed. Gary wrote:
While I wasn’t looking, FM became just another mode. At least that’s the consensus I got from some of the guys who have been doing Amateur Radio publishing a lot longer than I have…
Some columns devoted to sub-sets of Amateur Radio have lasted for decades. VHF-UHF is one. That’s the weak-signal side of VHF, not the FM side. Digital modes go through enough reincarnations to keep interest up. DX, contesting, QRP, holding their own.
But not FM/Repeaters? QST editor Steve Ford, WB8IMY, suggested why, and gave me the idea for this column’s “Utility Mode” tag line. He said, “Our research has shown that while FM users comprise a very large portion of the amateur community, the majority tend to perceive their FM activity more as a ‘utility’ function rather than a hobby.”
VHF FM is arguably the most common mode used in amateur radio. (Can I back that up with reliable data? Not sure, but I’m pretty sure it’s true.) I do see where it fits into the concept of a utility function or utility mode. Think about the electrical system in your house (a utility). For the most part, you just plug things in and use it but you probably don’t consider yourself a 120 VAC hobbyist. Well, a few of you might but that’s another issue. VHF FM is a lot like that…most hams have it and they just use it without too much consideration. Push the button and it works.
But that definition is a little bit derogatory…VHF FM is just there and no one appreciates it. The Eeyore of ham radio modes.
Another definition of utility (as an adjective) is:
This fits my perception of VHF FM: very useful for many things. Whether you are providing communications for a bike race, handling talk-in for a local hamfest, working the ISS, chatting across town while mobile, the first choice is likely to be 2m (or 70 cm) FM.
And that’s why I’ve always been a VHF FM enthusiast: there are so many things you can do with it. Just use your imagination.
73, Bob K0NR
To see what Gary KN4AQ has been up to lately, visit HamRadioNow.


 Joyce worked a subset of these stations. In particular, she was very happy to work three women. She has been referring to these contacts as “F2F” for “female to female.” On this activation, her F2F QSOs were: Annette/KA0JKZ, Sharon/KC0PBR and Barbara/W0BJE. Way to go, ladies!