The KØNR Radio
Site
The KØNR Radio
Site
|
|
|
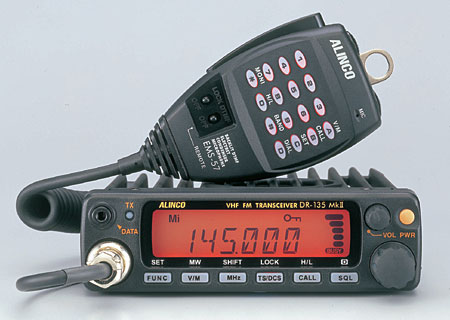
Using an Alinco DR-135TP 2M transceiver on APRS Here's what I learned about getting this to work Bob Witte, KØNR Warning: This document applies to the original Alinco DR-135TP...a newer version has been recently introduced-- the "MK II". I don't know what, if any, changes have been made to the TNC. This document captures some of the things that I learned while getting my Alinco DR-135TP (with optional internal EJ-41U TNC) to function on APRS® and packet radio. The documentation that comes with the radio is a bit thin, so perhaps this will help someone else getting started. The DR-135 instruction manual can be found on the Alinco web site. APRS® is a registered trademark of Bob Brunina WB4APR, which stands for Automatic Position Reporting System. The APRS specification is available from the TAPR web site.My main use of this radio and the focus for this article is APRS. You may learn something about APRS in this article but it is not intended to be an APRS tutorial. See the introductory article at aprsworld.net for more information on APRS. Also, this article is mainly concerned with how to configure the radio and TNC for basic operation using terminal emulator commands. If you are using software such as UI-View, WinAPRS, etc. then the radio configuration is handled for you by the software (maybe :-).
First, you need to get the TNC inside the DR-135TP talking to your computer. A serial cable with 9-pin connectors on both ends and a terminal emulation program are normally required. I am not going into a lot of detail here as serial connections are notoriously messy but relatively well-understood. In other words, go elsewhere to find out how to troubleshoot a serial connection. I used the standard MS Windows terminal emulation program "HyperTerminal" (under Programs, Accessories, Communications). To verify that your TNC/radio is talking to the computer, cycle power on the radio and you should see a power-up reset message that looks like this: TASCO RADIO MODEM You'll need to read the TNC manual to understand roughly how it works but you won't need detailed understanding of the commands. The TNC should be set to match the starting TNC settings (click here to view them). Basic APRS Beacon Settings First, we'll set up the TNC and radio for basic APRS operation from a fixed location. Our objective here is to have the radio burp out APRS-compatible strings that make your station visible to neighboring APRS stations. You'll need a computer to set the radio up but the radio/TNC can operate stand-alone after it is configured. You'll need to read the TNC manual to understand roughly how it works but you won't need detailed understanding of the commands. The TNC should be set to match the starting TNC settings (click here to view them). Set the DR-135 radio to operate on 144.390 MHz simplex, the standard APRS frequency in the US. You will also need to put the radio into "Packet Mode" by pressing the FUNC key, followed by the SQL key. APRS operation uses "connectionless" packet transmission, with all packets intended to be received by all stations within range. Forget about all of the packet features that have to do with "connecting" to another station since those won't be used for APRS. There are six TNC commands that we will need to understand and use: BTEXT, LTEXT, UNPROTO, LPATH, BEACON and LOCATION. BTEXT is the standard TNC command that determines what text goes into the "beacon" transmission. We will use the beacon transmission to send out the APRS Status message. The status message gets used for a variety of things but most people put something like their name, email address, geographic location or some bit of information about their status (heading home, at home, on the road to New York, ...). Basically, the only thing we need to do to make this string APRS-compatible is to start with a ">" symbol, which indicates that the following text is a status message. For example, my BTEXT message might be BTEXT > Bob in Monument, CO emailaddress@arrl.net The LTEXT command is (apparently) an Alinco-specific command that creates a "location" message similar to the BTEXT message. To make the location fit the APRS spec, we start the message with an exclamation point "!", followed by latitude and longitude, followed by a character that indicates the symbol associated with our station, followed by a text comment. The lat/lon are in degrees/minutes format (NOT decimal degrees). In the example below, the latitude is 39 degrees 07.53 minutes North and the Longitude is 104 degrees 53.02 minutes West. The latitude and longitude are separated by a "/". The "-" character following the lat/lon indicates that this station's symbol is a HOUSE. LTEXT !3907.53N/10453.02W- Bob listening on
146.52 MHz UNPROTO APRS VIA RELAY,WIDE The LPATH command works the same as UNPROTO command but applies to the location message set by LTEXT: LPATH APRS VIA RELAY,WIDE
BEACON EVERY 180 Once configured as described, the DR-135 will burp out APRS-compliant packets that indicate the location and the status of the amateur radio station. APRS Tracker Settings The DR-135TP can take location data from a GPS receiver using NEMA-0183 format and use that to form a APRS position message. Refer to the DR-135TP owners manual for information on the cable required to connect the GPS and the radio. You will also need to consult your GPS manual to make sure that it outputs the proper information format. on from a fixed location. Our objective here is to have the radio burp out APRS-compatible strings that make your station visible to neighboring APRS stations. You'll need a computer to set the radio up but the radio/TNC can operate stand-alone after configuration. The GBAUD command sets the serial baud rate (on the radio TNC end) for the interface to the GPS. Usually this is set to 4800 baud: GBAUD 4800 The GPSTEXT command specifies the format of the message that will be sent by the LOCATION and LTEXT commands. Basically, this command tells the GPS what information to supply and then shoves that information into the LTEXT output string. This command should be set to "$GPRMC": GPSTEXT $GPRMC This format transfers date, time, latitude, longitude, speed and direction. The GTEXT command essentially overwrites the information in the LTEXT buffer, so we lose the symbol information that was previously embedded in the text string. The APRS specification provides a way to work around this problem by embedding the symbol information in the UNPROTO destination address. The address of the form GPSCxy is designed to indicate a particular mapping symbol, based on the numbers substituted for "xy". To indicate a car symbol, GPSC30 is used: LPATH GPSC30 VIA RELAY,WIDE The destination address for other symbols can be found in the APRS specification but a few are provided here: GPSC50 Recreational Vehicle With these settings, the DR-135TP and GPS receiver can operate as a stand-alone tracker, sending position data out automatically in APRS format. When mobile, you'll probably want to send out the location every few minutes, depending on how fast you are moving. |
|
|